
No results available
Reset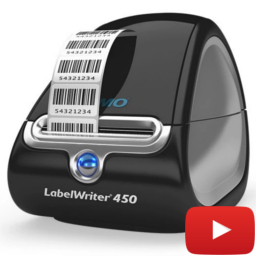
Print Labels with Barcodes. Create price tags, product labels, order labels for WooCommerce
by UkrSolution
Description
Generate & print barcode labels for WooCommerce products and orders. Put various data on labels like price, SKU, name, attributes, customer data, etc
Core features
✔ Generate and print barcode labels for products & orders
✔ Printers support: A4, Letter, P4 & label/thermal printers
✔ Labels can contain: barcode, name, SKU, price, attributes, etc
When your store is growing it could be pretty difficult to manage inventory and orders effectively. Try to improve your workflow by printing barcode labels for your products.
Printed labels can contain various product information which helps to understand the basic details about the product.
And the barcode (on the label) allows to get all the product information from WooCommerce using your POS system.
In combination with our Barcode Scanner plugin, you can scan the barcode and get all the basic product details to manage inventory as fast as possible. And the mobile app allows to scan the barcode and manage your inventory right from the smartphone.
All Features
Labels can contain: SKU, price, name, attributes, custom fields and any other fields.
Print barcode labels for your existing products, purchased items or create & print labels manualy.
WooCommerce if fully supported along with product variations, attributes, custom fields, etc.
Printers supported: A4, Letter, P4; Roll/Thermal label printers like DYMO, Zebra, Brother and other models.
Barcode labels can be read by scanners or iPhone/Android smartphones
Full supports of “Contact Form 7” and “Flamingo” form fields.
Possibility of the label template customization.
Supported barcode types: CODE128, CODE39, QRCode, DataMatrix, GTIN, GS1 family (UPC-A, UPC-E, EAN-13, EAN-8)
Customized & personalized labels:
“Barcode Label Printing” plugin allows to print labels with customized design to fit your shop brand.
You can print labels with logo, texts, attributes, custom fields, and any other design elements (requires development of the label HTML template)
Read more on this page for more information.
Please note: This is a Demo version of “Barcode Label Printing” plugin. It’s free to review all features of this plugin except printing itself.
To get a full version you’ll need to buy a license.
Get Full Version Here
Possible use cases
Printing barcode labels for existing products
Plugin allows to create labels for existing products.
You can print labels (with or without the barcode) in 4 different ways:
* “All Products” page – you can check/select a few products and then press “Product Label” button at the top of the product list.
* “All products” page – create label for 1 specific product by clicking on “Label” icon near each product in the product list.
* “Product edit” page – you will find button “Product Label” above product description for the current product.
* “Product edit” page – you will find buttons “Product Label” for each variation in the “Variations” section.
Printing barcode labels for purchased items
Use this plugin to create labels for purchased items in the order.
There 3 ways to create such labels:
* “Orders” page – check/select one or a few orders and press “Product Label” button at the top of he order list.
* “Inner Order” page – Open one specific order and press “Product Label” button on the right hand side (in a widgets section).
* “Inner Order” page – Each purchased item has a “Select” checkbox which you can mark and then press “Create Product Labels” button below the purchased items.
Scanning the barcodes
The barcodes on the labels can be scanned by various software. You may already have some barcode scanning plugin (or POS system) which will allow you to scan and manage the products/orders.
However, if you don’t have such plugin yet, we recomend you to use our lite Barcode Scanner plugin for fast and effective inventory/order managment. With this plugin you simply scan the barcode and associated product or order will be shown to you in a few seconds. And the iOS/Android app will allow you to do so from the smartphone.
How to:
Barcode labels Manually:
Click at “Barcode Printer” -> “Open Preview” menu – popup will appear.
Fill in “Barcode” field with product SKU or any other code as this field is used for barcode generating.
You could also fill optional fields “Line1” – “Line4” for adding any additional information.
Select “Type” of barcode – read more about barcode types here.
Click “Add to Page” button and new label will appear at the preview.
You can add any amount of barcodes/pages before printing them.
Press “print labels” button
Import Products:
Go to WooCommerce “Product List” page.
Select/check products which you would like to import.
Click on “Generate Barcodes” button and popup will open with similar settings like when you created barcodes manually.
Match fields “Barcode”, “Line1” – “Line4” with proper columns and select “Type” of barcode and then click “Generate” button.
You can repeat above actions many times and then print all added barcodes by clicking “Print” button.
Press “print labels” button
Import Categories
Go to WooCommerce Categories page.
Select categories you would like to import and press “Generate Barcodes” button.
Match fields “Barcode”, “Line1” – “Line4” with proper columns and select “Type” of barcode and then click “Generate” button.
Note: It might be a not good idea to try to import thousends of products at the same time.
Press “print labels” button
Import Orders
Go to WooCommerce Orders page.
Select orders you would like to import and one of the buttons: “Import Orders” or “Import Products”.
“Import Orders” button will create barcode label for a whole order.
“Import Products” button will create barcode for each product in the order.
Match fields “Barcode”, “Line1” – “Line4” with proper columns and select “Type” of barcode and then click “Generate”.
Press “print labels” button
Import forms from “Contact Form 7” & “Flamingo”
Go to “Flamingo”->”Inbound Messages” page.
Select forms you would like to import and press “Generate Barcode” button.
Match fields “Barcode”, “Line1” – “Line4” with proper columns and select “Type” of barcode and then click “Generate”.
Press “print labels” button
How to Add new label sheet:
Click in menu “Open Preview”
Click on “Labels sheet” dropdown and select “+ Add new” at the bottom.
In popup “New label sheet” enter all required sizes. You can find all these sizes on label sheet box.
Click “Add Format”.
More information about bar-code plugin fing here:
Barcode Labels Printing
FAQ
User Manual

Lorem ipsum dolor sit amet, consectetur adipiscing elit. Ut elit tellus, luctus nec ullamcorper mattis, pulvinar dapibus leo.
To create a collection, simply click on the ![]() symbol on the desired plugin.
symbol on the desired plugin.
You can see this symbol when you move the mouse over the plugin.
Current Level
You have reached 0 views on your collections and are currently Plugin Magican. You magically help people find the right plugins and are a great asset to the community